
Right from the outset, the implementation of Roblox Studio in our library has been entirely driven by student interest. It was students who showed me the platform in the beginning and since then, it has been in observing the students that I have learnt what to do next. I have not used the lesson materials provided by Roblox because the students have learnt by experimenting and sharing their knowledge as a group. That said, for the more advanced users, Roblox provides heaps of design advice, how-to guides and other resources (see links below) but I think it is best to leave access to these resources up to the students to select as they need them for their own designs.
Here are some helpful tips to get you started in your classroom or library:
1. Create a library or classroom account
I did this for a few reason but mostly to do with child safety. Setting up a class account provides a safe onramp for new designers in your class to have a taste without the need to set up their own account. The problem with a shared account is that, 1. Similar to a playground sandpit, all users of the account can interfere with any other creations, 2. Students don’t have control over their own experience, and 3. I think there is a limit to the number of worlds an account can build.
That said, if you are nervous about having each student create their own individual accounts, then a library/classroom account provides opportunities for students to get started experimenting with Roblox Studio.
2. Download Roblox Studio
Click “Start Creating” on the Roblox.com/create website. Roblox will check if you have it installed already then offer you the option to download the “RobloxStudio.dmg” file required to install the software on your computer. Please note, while you can play Roblox games on iPads, iPhones and other mobile devices, you can only create games on a Mac or Windows PC. Once downloaded, open the .dmg file and install Roblox Studio.
3. Open up Roblox Studio and log in
When you first open Roblox Studio and enter your account details, the programme may ask you to log in online. This is part of their security protocols – annoying but I appreciate the care they take to stop hackers, malicious users and malware.
Important to note: Roblox often hangs with the dreaded lollypop spinning wheel. I am not sure why this is but the only solution we have found has been to force-quit the programme (on a Mac use the “Option-Command-Esc” (⌘ ⌥ esc) ) and restart it. This is very frustrating however a significant learning experience for students. Many programmes such as Roblox Studio are not perfect and learning to manage the glitches and problem solve in any tech environment is essential.

Most times when you open up Roblox, it will go through a process of “Upgrading Roblox Studio” (see Figure 1). This can be slow and frustrating for students however, once again, for a powerful programme such as this, understanding and working with the quirks is good learning for any tech environment.
Once you have logged in you can begin creating.
4. Begin creating
Roblox offers you a range of templates to begin developing your first game (see figure 2). For beginners I often start with “Flat Terrain” to learn how to edit the “terrain” and add models but, to be honest, it is wonderful for kids to play around on the more complex templates. “Volcanic Island” is a favourite but, because it is quite a complex design, it can be slow to load, often hangs (the dreaded lolly-pop spinning wheel), and can be glitchy at times.

4. Navigation
It is important to become familiar with how to navigate around your world – here are the basic controls. The basic controls in Roblox Studio use the WASD, F, QE keys, and arrow keys. And the L or R click (see Figure 3).

5. “(re)Design <> play” cycle
Straight away, we want kids to be able to play in the world they are designing so it is important for them to understand how to do this (See Figure 4). Click “Play” to drop your avatar into the game world and begin playing your game. Click “Stop” to move out of play mode into design mode. A common problem kids have is that they can make edits to the world in Play mode but these edits cannot be saved and are lost as soon as “Stop” play is selected. I am always present when kids are using Roblox and encourage them to frequently move between “Play” and “Stop” as they refine their game.

6. Editing the terrain
I often find that when I show kids how to edit the terrain to create mountains, caves, rivers, beaches, hills or anything else in the landscape, they seem to enjoy this. Here is how to start editing the terrain (Figure 5).

7. Adding models to your world
Adding a model such as a car, pet, tree, house, water slide, stage, jet pack, sign, road, ball-pit or just about anything else you can imagine is a great way to start to explore how fun Roblox Studio can be (See Figure 6). Be sure to click on “Play” to see what your world looks like from the player view.

7. Save your masterpiece
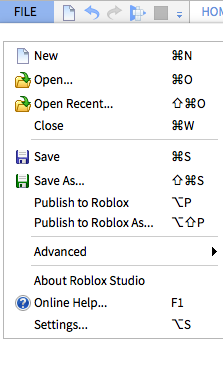
There are two ways to save your new game (Figure 7).
- “Save” from the “File” menu. This will save the Roblox game as a *.rbxl file offline to your local computer.
- “Publish to Roblox”. You will be prompted to create a “New Place” if it is the first time you are saving your design. By default your published game is private so it cannot be seen by anyone else online until you are ready to launch your new game. We use “Publish to Roblox” most often because these games can be accessed from any computer once you have logged in with your account. This does require WiFi with sufficient bandwidth and the patience to download a project every time you want to work on it. We use this because, until now, we could not be certain which computer each student would be using.
8. Should students create their own accounts?
Students who want to take Roblox Studio further need to have their own accounts however I ask that they create new accounts with their parents. I have written about this in a separate post on child safety.
9. From here, the world is at your fingertips
There is so much to explore and create from here but this gives you a place to begin. Roblox has heaps of support materials and a lively user community to get you connected and building fun stuff.
:: Download Roblox Studio here.
:: Roblox Help and support website.
:: Roblox Corporation homepage.
:: Roblox Developer site.
:: Roblox Education support.
:: Roblox blog.
:: Download Roblox game player.

3 thoughts on “Getting started with Roblox Studio in the library or classroom”